1、常见的存储类型
- DAS(Direct-AttachedStorage)直接附加存储,存储设备一般通过scsi/ide总线直接连接到主机上,常见的如SATA硬盘,SAS硬盘等,直接通过准线连接到计算机主板上面。该方式显著的优点就是传输速度快,但传输距离受总线长度限制,且只能供本地使用。
- NAS(Network AttachedStorage)网络附加存储,将存储设备与服务器分离,集中管理数据,从而提升并发存储能力、降低维护成本。典型的应用示例有NFS服务器,SAMBA服务器,NFS服务器等文件服务器,通过向外提供文件系统的方式向外提供存储
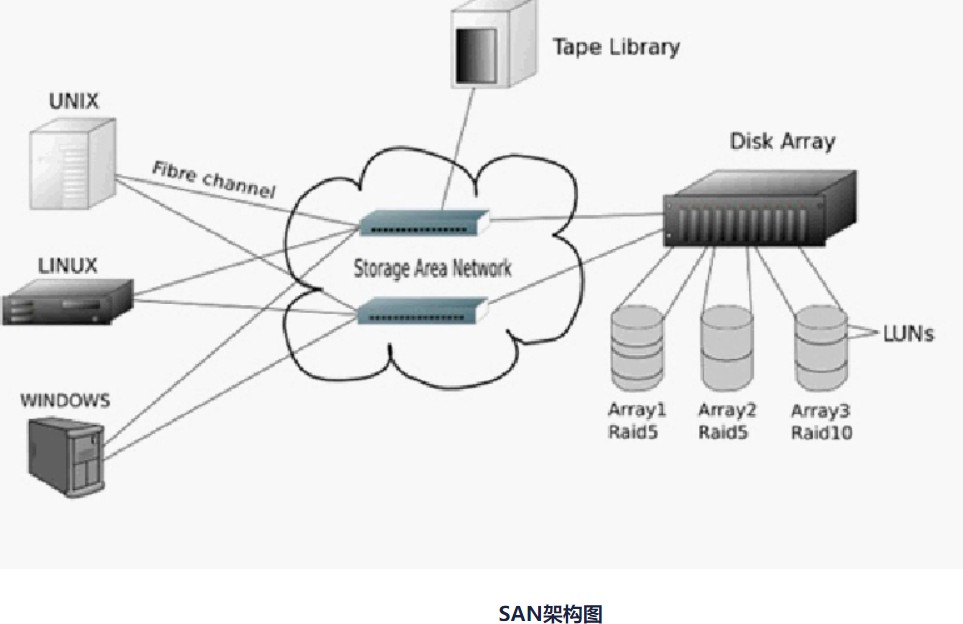
- SAN(Storage Area Network)存储区域网络,采用FC(Fibre Channel)光纤通道或者Ethernet进行远距离传输,区别于Fiber Channel光纤通道技术,通过FC交换机连接存储阵列和服务器主 机,建立专用于数据存储的区域网络。
三种类型存储的区别
DAS与SAN都是块级别(Block-level)的存储,而NAS是文件系统(File System level)级的存储。因为文件系统是操作系统对磁盘数据的一次封装。每次对数据访问时提供文件服务的服务器都要对数据进行数据封装,和解封装,然后再对块设备磁盘进行读写。而DAS是直接对块设备进行读写,因此NAS的存储速度不如前面两者。
SAN(Storage Area Network)相当于模拟了远距离传输的DAS,特点是速度快。支持的并发服务主机数量多。大家都知道远距离传输是需要跨越Internet,而广域网的带宽是远不能和局域网相比的,因此缺点便是网络速度瓶颈问题。
iSCSI(Internet SmallComputer System Interface)基于Internet的小型计算机系统接口,由IBM公司研究开发的,是一个可以让硬件设备在IP协议的上层运行的SCSI指令集存储技术,可以实现在IP网络上运行SCSI协议,使其能够在诸如高速千兆以太网上进行路由选择。iSCSI技术是一种新储存技术,该技术是将现有SCSI接口与以太网络(Ethernet)技术结合,使服务器可通过IP网络进行远距离SCSI类型的数
据存储设备由 SCSI 总线连接。iSCSI 的主要功能是在 TCP/IP 网络上的主机系统(启动器 initiator)和存储设备(目标器 target)之间进行大量数据的封装和可靠传输过程。此外,iSCSI 提供了在 IP 网络封装 SCSI 命令,且以TCP/IP协议传输。iSCSI服务端程序监听端口为明文的TCP/3260。
实际生产环境中,一般都是使用集群搭建服务器,如果两台或多台服务器都是使用独立磁盘,那么磁盘的容量会有相应的限制,使用ISCSI 技术,实现远程磁盘的使用,集群的服务器都挂在同一个远程存储设备到本地实现数据读写,这样也就减少了一个同步数据的任务,大大减轻了服务器的资源消耗。
|
术语 |
功能描述 |
|
启动器 |
一个iscsi客户端,通常以软件提供,必须为启动器授予唯一名称。 |
|
目标 |
一个iSCSI存储资源,针对来自iSCSI服务器的连接而配置。必须为目标授予唯一名称。目标提供一个或多个带有编号的块设备,称为逻辑单元。一个iSCSI服务器可以同时提供多个目标。 |
|
发现 |
查询目标服务器以列出配置的目标。 |
|
ACL |
访问权限控制列表,一种使用节点IQN(通常是启动器名称)来验证启动器的访问权限的访问限制。 |
|
IQN |
iSCSI限定名称,全球唯一名称,用于以强制命名格式来识别启动器和目标。 IQN格式如下: iqn.YYYY-MM.com.reversed.domain[:optional_string] iqn:表示此名称使用域为标识符。 YYYY-MM:表示拥有域名的年月时间。 com.reversed.domain:拥有此iSCSI组织的逆向域名 :optional_string:以冒号为前缀的可选字符串,全球唯一,由域所有者根据需要分配, |
|
LUN |
逻辑单元号,带有编号的块设备,连接到目标且通过目标来使用。可以有一个或多个LUN连接到单个目标,但通常一个目标提供一个LUN |
|
节点 |
任何一个iSCSI启动器或iSCSI目标,由其IQN来标识。 |
|
TPG |
目标门户组,某个特定iSCSI目标要侦听的接口IP地址和TCP端口的集合。可以将目标配置添加到TPG以协调多个LUN的设置。 |
|
门户 |
目标或启动器上用于建立的IP地址和端口。 |
在原始的SCSI协议术语中,目标是指在SCSI总线上唯一标识的单个可连接的存储或输出设备。在
iSCSI中,SCSI总线是在IP网络中仿真,目标可以是网络附加存储机柜中的专用物理设备,也可以是网络存储服务器上iSCSI软件配置的逻辑设备。
环境描述
|
IP |
功能 |
|
192.168.26.201 |
ISCSI服务端 |
|
192.168.26.202 |
ISCSI客户端 |
本章使用磁盘分区作为存储设备,将主机磁盘/dev/sdb进行分区,其中分区/dev/sdb1大小为10G,未曾格式化,以此来提供存储空间。
|
28 |
NAME |
MAJ:MIN |
RM |
SIZE |
RO |
TYPE |
MOUNTPOINT |
|
29 |
sda |
8:0 |
0 |
100G |
0 |
disk |
|
|
30 |
├─sda1 |
8:1 |
0 |
500M |
0 |
part |
/boot |
|
31 |
└─sda2 |
8:2 |
0 |
42G |
0 |
part |
|
|
32 |
├─centos-root |
253:0 |
0 |
40G |
0 |
lvm |
/ |
|
33 |
└─centos-swap |
253:1 |
0 |
2G |
0 |
lvm |
[SWAP] |
|
34 |
sdb |
8:16 |
0 |
100G |
0 |
disk |
|
|
35 |
└─sdb1 |
8:17 |
0 |
10G |
0 |
part |
|
|
36 |
sr0 |
11:0 |
1 |
4.5G |
0 |
rom |
1
2
3
4
5
6
7
8
9
10
11
12
13
14
15
16
17
18
19
[root@iscsi-server ~]# fdisk /dev/sdb
Welcome to fdisk (util-linux 2.23.2).
Changes will remain in memory only, until you decide to write them. Be careful before using the write command.
Device does not contain a recognized partition table
Building a new DOS disklabel with disk identifier 0x6b62b934.
Command (m for help): n
Partition type:
p
e
primary (0 primary, 0 extended, 4 free)
extended
20
21
22
23
24
25
26
27
Select (default p):
Using default response p Partition number (1-4, default 1):
First sector (2048-209715199, default 2048):
Using default value 2048
Last sector, +sectors or +size{K,M,G} (2048-209715199, default 209715199):
+10G
Partition 1 of type Linux and of size 10 GiB is set
Command (m for help): w
The partition table has been altered!
Calling ioctl() to re-read partition table. Syncing disks.
[root@iscsi-server ~]# lsblk
在服务器端可以使用targetcli交互式shell工具,在其中可以创建删除和配置iSCSI目标组件,并且在此命令行工具中支持shell常用的Linux命令:cd、ls、pwd等。可以通过yum安装targetcli包提供此命令(此命令是红帽7.2版本才支持的命令,之前使用tgtadm命令管理iSCSI设备)。
1 [root@iscsi-server ~]# yum -y install targetcli
执行targetcli命令,不带任何选项,进入交互模式,targetcli处于初始空白配置。
- [root@iscsi-server ~]# targetcli
- Warning: Could not load preferences file /root/.targetcli/prefs.bin.
- targetcli shell version 2.1.53
- Copyright 2011-2013 by Datera, Inc and others.
- For help on commands, type 'help'. 6
7
8
9
10
11
12
13
14
15
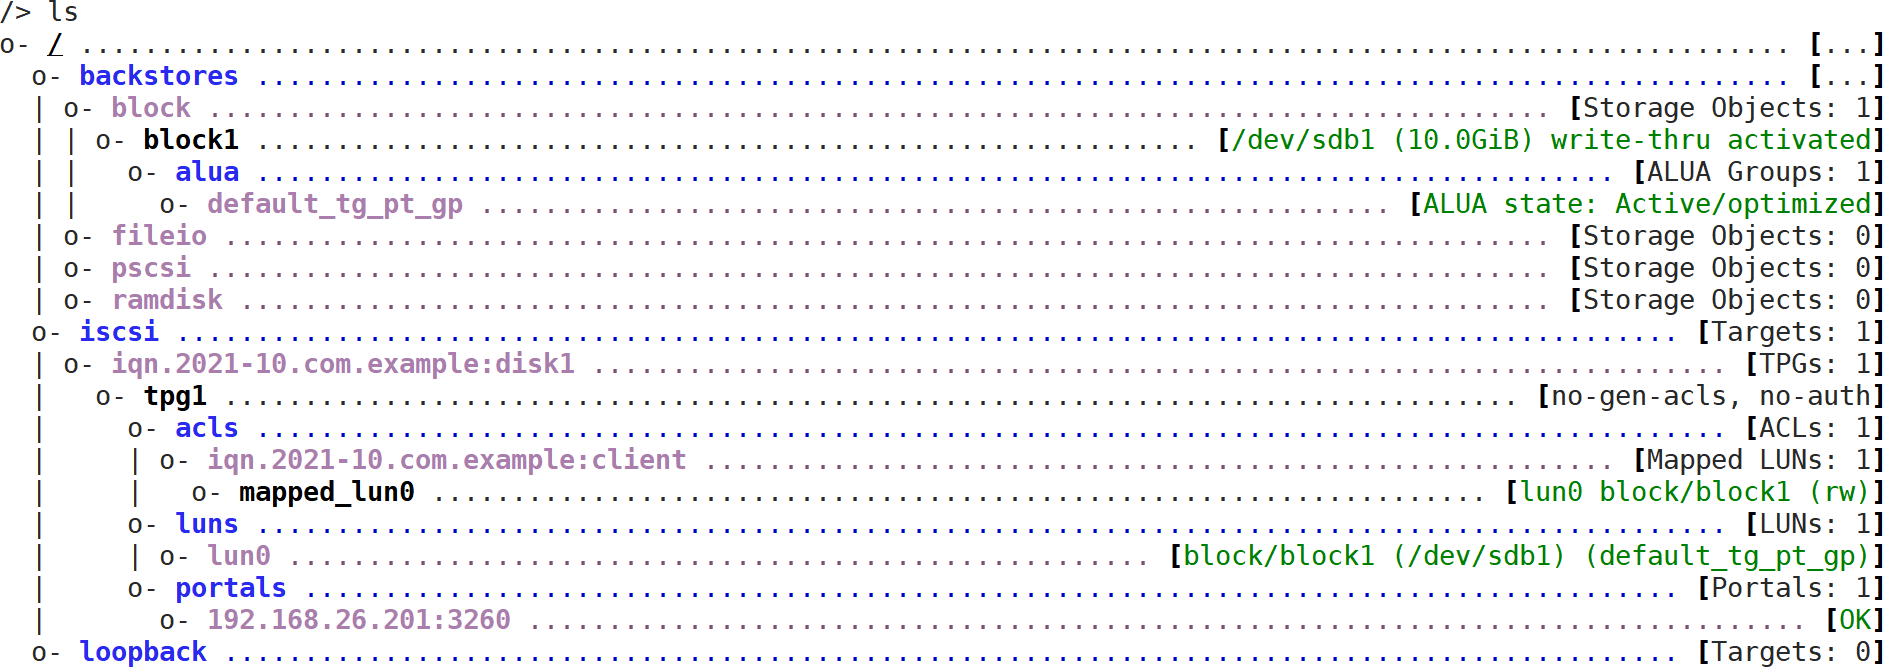
/> ls o- /
............................................................................
.. [...]
o- backstores
................................................................... [...]
| o- block .......................................................
[Storage Objects: 0]
| o- fileio ......................................................
[Storage Objects: 0]
| o- pscsi .......................................................
[Storage Objects: 0]
| o- ramdisk .....................................................
[Storage Objects: 0]
o- iscsi .................................................................
[Targets: 0]
o- loopback ..............................................................
[Targets: 0]
创建后备存储
后备存储一共分为4种,如下:
|
类型 |
描述 |
|
block |
服务器上的定义的块设备,包括磁盘驱动器、磁盘分区、逻辑卷、多路径设备以及服务器上定义的任何b类型的设备文件 |
|
fileio |
在服务器文件系统中创建一个指定大小的文件,此方法类似于使用映像文件作为虚拟机磁盘映像的存储 |
|
pscsi |
物理SCSI,允许透传到连接服务器的物理SCSI设备,通常不使用此后备存储类型 |
|
ramdisk |
在服务器上的内存中创建一个指定大小的ramdisk设备,这种类型的存储将不会持久的存储数据,当服务器重新启动时,ramdisk定义将在目标实例化时返回,但是所有数据都将丢失 |
本次使用block类型的后备存储,将之前准备的大小为10GB的磁盘分区/dev/sdb1关联到block中,且后备存储名称为block1
- /> cd backstores/
- /backstores> ls
- o- backstores
..................................................................... [...]
- o- block .........................................................
[Storage Objects: 0]
- o- fileio ........................................................
[Storage Objects: 0]
- o- pscsi .........................................................
[Storage Objects: 0]
- o- ramdisk .......................................................
[Storage Objects: 0]
- /backstores> cd block
- /backstores/block> ls
- o- block ...........................................................
[Storage Objects: 0]
- /backstores/block> create block1 /dev/sdb1
- Created block storage object block1 using /dev/sdb1.
- /backstores/block> cd ../
- /backstores>
创建IQN,IQN名称为iqn.2021-10.com.example:disk1
- /> cd iscsi
- /iscsi> create iqn.2021-10.com.example:disk1
- Created target iqn.2021-10.com.example:disk1.
- Created TPG 1.
- Global pref auto_add_default_portal=true
- Created default portal listening on all IPs (0.0.0.0), port 3260.
- /iscsi> ls
- o- iscsi ...................................................................
[Targets: 1]
- o- iqn.2021-10.com.example:disk1
............................................ [TPGs: 1]
- o- tpg1 ...................................................... [no-gen-
acls, no-auth]
- o- acls
................................................................. [ACLs: 0]
- o- luns
................................................................. [LUNs: 0]
- o- portals ...........................................................
[Portals: 1]
14 o- 0.0.0.0:3260
. [OK]
15 /iscsi>
16
iSCSI协议是通过客户端名称进行验证的,也就是说,用户在访问存储共享资源时不需要输入密码,只要iSCSI客户端的名称与服务端中设置的访问控制列表中某一名称条目一致即可,因此需要在iSCSI服务端的配置文件中写入一串能够验证用户信息的名称。acls参数目录用于存放能够访问iSCSI服务端共享存储资源的客户端名称。
在TPG中,创建ACL以控制客户端节点的访问,ACL名称为iqn.2021-10.com.example:client
- /iscsi> cd iqn.2021-10.com.example:disk1/
- /iscsi/iqn.20...example:disk1> ls
- o- iqn.2021-10.com.example:disk1
.............................................. [TPGs: 1]
- o- tpg1 ........................................................ [no-gen-
acls, no-auth]
- o- acls
. [ACLs:
0]
- o- luns
. [LUNs:
0]
- o- portals .............................................................
[Portals: 1]
8 o- 0.0.0.0:3260
. [OK]
- /iscsi/iqn.20...example:disk1> cd tpg1/acls
- /iscsi/iqn.20...sk1/tpg1/acls> create iqn.2021-10.com.example:client
- Created Node ACL for iqn.2021-10.com.example:client
- /iscsi/iqn.20...sk1/tpg1/acls> ls
- o- acls
....................................................................... [ACLs: 1]
- o- iqn.2021-10.com.example:client ....................................
[Mapped LUNs: 0]
- /iscsi/iqn.20 sk1/tpg1/acls>
此ACL将目标配置为仅接受来自以iqn.2021-10.com.example:client作为启动器名称的客户端连接
在TPG中,为每个后备存储创建一个LUN,此步骤还将激活每个后备存储, 由于TPG中存在ACL,因此
ACL将自动分配给每个创建的LUN,此处为block1后备存储创建LUN
- /iscsi/iqn.20...sk1/tpg1/acls> cd ..
- /iscsi/iqn.20...le:disk1/tpg1> cd luns
- /iscsi/iqn.20...sk1/tpg1/luns> create /backstores/block/block1
- Created LUN 0.
- Created LUN 0->0 mapping in node ACL iqn.2021-10.com.example:client
- /iscsi/iqn.20...sk1/tpg1/luns> ls
- o- luns
....................................................................... [LUNs: 1]
- o- lun0 ................................. [block/block1 (/dev/sdb1) (default_tg_pt_gp)]
- /iscsi/iqn.20...sk1/tpg1/luns>
创建一个LUN分配给目标,当启动器连接到该目标时,将连接上一个新的SCSI设备。
创建门户
在TPG中,创建一个门户配置侦听IP地址和端口,侦听的IP地址为服务器上本地网络接口的IP地址,端口为标准的ISCSi端口3260,由于在“为目标创建IQN”时进行了默认的门户创建,所以建议先删除默认门户配置。
- /iscsi/iqn.20...sk1/tpg1/luns> cd ..
- /iscsi/iqn.20...le:disk1/tpg1> cd portals/
- /iscsi/iqn.20.../tpg1/portals> ls
- o- portals .................................................................
[Portals: 1]
5 o- 0.0.0.0:3260
. [OK]
- /iscsi/iqn.20.../tpg1/portals> delete ip_address=0.0.0.0 ip_port=3260
- Deleted network portal 0.0.0.0:3260
- /iscsi/iqn.20.../tpg1/portals> create ip_address=192.168.26.201 ip_port=3260
- Using default IP port 3260
- Created network portal 192.168 26.201:3260.
- /iscsi/iqn.20.../tpg1/portals> ls
- o- portals .................................................................
[Portals: 1]
13 o- 192.168.26.201:3260
. [OK]
14 /iscsi/iqn.20 /tpg1/portals>
退出targetcli后, targetcli的所有配置将自动保存,生成的持久配置文件以javascript对象表示法
(JSON)格式来存储,存储文件位于/etc/target/saveconfig.json。
- [root@iscsi-server ~]# systemctl start target
- [root@iscsi-server ~]# systemctl enable target
5、客户端访问
在CentOS 7系统中,已经默认安装了iSCSI客户端服务程序initiator。如果您的系统没有安装的话,可以使用Yum软件仓库手动安装。
修改/etc/iscsi/initiatorname.iscsi配置文件,启动服务
iSCSI协议是通过客户端的名称来进行验证,而该名称也是iSCSI客户端的唯一标识,而且必须与服务端配置文件中访问控制列表中的信息一致,否则客户端在尝试访问存储共享设备时,系统会弹出验证失败的保存信息。
- [root@client ~]# vim /etc/iscsi/initiatorname.iscsi
- InitiatorName=iqn.2021-10.com.example:client
- [root@client ~]# systemctl start iscsi
- [root@client ~]# systemctl enable iscsi
1 [root@client ~]# yum -y install iscsi-initiator-utils
发现目标
在ISCSI客户端连上目标之前,必须先发现目标,发现过程将目标节点信息和设置存储
在/var/lib/iscsi/nodes目录中,并且使用/etc/iscsi/iscsid.conf配置文件中的默认值,,使用到的命令如下:
1
2
3
4
5
6
7
8
9
10
11
12
13
14
15
16
17
18
19
20
21
22
23
24
25
26
27
28
29
30
31
32
33
iscsiadm是一个模式化的命令,是客户端的命令
-m {discovery|node|session|iface}
discovery:发现某个server是否有target输出及有哪些输出 node:自己作为节点与server端建立连接
session:查看会话 iface:进行接口管理的
-d:debug_lebel 等级为0—8越高输出的debug信息越详细,可省略
-I:指定使用哪个网络接口,如果只有一块网卡则不用指定
-t:sendtarget,slp,iSNS三种形式,一般用的是sendtarget简写为st
-p:IP:port IP为server的IP,port可以省略,默认为3260
发现输出target后与登录target有关的
-U 登出
-R 重新登入
-l 登入
-T 指定targetname
-p 指定server的IP/port
-s 显示session的统计数据
 发现目标
发现目标
- [root@client ~]# iscsiadm -m discovery -t st -p 192.168.26.201:3260
- 192.168.26.201:3260,1 iqn.2021-10.com.example:disk1
发现目标后,使用iscsiadm命令可以获得有关目标的信息,同时使用选项"-P N" 可以查看不同详细级别的信息,其中N为数字,使用iscsiadm获得有关目标信息的具体命令及描述如下:
iscsiadm -m discovery [-P 0 | 1] : 显示有关已发现目标的信息
iscsiadm -m node [-P 0 | 1 ] : 显示有关已知目标的信息
iscsiadm -m session [-P 0 | 1| 2| 3] :显示有关活动会话的信息
- [root@client ~]# iscsiadm -m discovery -P 1
- SENDTARGETS:
- DiscoveryAddress: 192.168.26.201,3260
- Target: iqn.2021-10.com.example:disk1
5 Portal: 192.168.26.201:3260,1
- Iface Name: default
- iSNS:
- No targets found.
- STATIC:
- No targets found.
- FIRMWARE:
- No targets found.
登录目标
语法格式如下:
iscsiadm -m node -T 发现的目标IQN [ -p target_server[:port]] -l
- [root@client ~]# iscsiadm -m node -T iqn.2021-10.com.example:disk1 -p 192.168.26.201:3260 -l
- Logging in to [iface: default, target: iqn.2021-10.com.example:disk1, portal: 192.168.26.201,3260] (multiple)
- Login to [iface: default, target: iqn.2021-10.com.example:disk1, portal: 192.168.26.201,3260] successful.
登录成功后,使用命令fdisk -l 查看磁盘情况,会发现客户端多了一个块存储设备
1 [root@client ~]# fdisk -l 2
3 Disk /dev/sda: 107.4 GB, 107374182400 bytes, 209715200 sectors
- Units = sectors of 1 * 512 = 512 bytes
- Sector size (logical/physical): 512 bytes / 512 bytes
- I/O size (minimum/optimal): 512 bytes / 512 bytes
- Disk label type: dos
- Disk identifier: 0x000ac425 9
|
10 |
Device |
Boot |
Start |
End |
Blocks |
Id |
System |
|
11 |
/dev/sda1 |
* |
2048 |
1026047 |
512000 |
83 |
Linux |
|
12 |
/dev/sda2 |
1026048 |
89122815 |
44048384 |
8e |
Linux LVM |
|
|
13 |
- Disk /dev/mapper/centos-root: 42.9 GB, 42949672960 bytes, 83886080 sectors
- Units = sectors of 1 * 512 = 512 bytes
- Sector size (logical/physical): 512 bytes / 512 bytes
- I/O size (minimum/optimal): 512 bytes / 512 bytes
18
19
- Disk /dev/mapper/centos-swap: 2147 MB, 2147483648 bytes, 4194304 sectors
- Units = sectors of 1 * 512 = 512 bytes
- Sector size (logical/physical): 512 bytes / 512 bytes
- I/O size (minimum/optimal): 512 bytes / 512 bytes
24
25
26 Disk /dev/sdb: 10.7 GB, 10737418240 bytes, 20971520 sectors
- Units = sectors of 1 * 512 = 512 bytes
- Sector size (logical/physical): 512 bytes / 512 bytes
29 I/O size (minimum/optimal): 512 bytes / 4194304 bytes
在ISCSI客户端上对/dev/sdb设备进行分区,并格式化,规划划分分区大小为3G,格式化文件系统为xfs
-
- [root@client ~]# fdisk /dev/sdb
- Welcome to fdisk (util-linux 2.23.2).
3
- Changes will remain in memory only, until you decide to write them.
- Be careful before using the write command. 6
- Device does not contain a recognized partition table
- Building a new DOS disklabel with disk identifier 0x253cf37c. 9
- Command (m for help): n
- Partition type:
- p primary (0 primary, 0 extended, 4 free)
- e extended
- Select (default p):
- Using default response p
- Partition number (1-4, default 1):
- First sector (8192-20971519, default 8192):
- Using default value 8192
- Last sector, +sectors or +size{K,M,G} (8192-20971519, default 20971519): +3G
- Partition 1 of type Linux and of size 3 GiB is set 21
- Command (m for help): w
- The partition table has been altered! 24
25 Calling ioctl() to re-read partition table.
26 Syncing disks.
27 [root@client ~]# mkfs.xfs /dev/sdb1
28 meta-data=/dev/sdb1 isize=512 agcount=4, agsize=196608 blks
29 = sectsz=512 attr=2, projid32bit=1
30 = crc=1 finobt=0, sparse=0
31 data = bsize=4096 blocks=786432, imaxpct=25
32 = sunit=0 swidth=0 blks
33 naming =version 2 bsize=4096 ascii-ci=0 ftype=1
34 log =internal log bsize=4096 blocks=2560, version=2
35 = sectsz=512 sunit=0 blks, lazy-count=1
36 realtime =none extsz=4096 blocks=0, rtextents=0
 创建挂载目录,挂载
|
1 2 3 |
[root@client ~]# mkdir /iscsistorage [root@client ~]# mount /dev/sdb1 /iscsistorage/ [root@client ~]# df -Th |
||||||
|
4 |
Filesystem |
Type |
Size |
Used |
Avail |
Use% |
Mounted on |
|
5 |
devtmpfs |
devtmpfs |
979M |
0 |
979M |
0% |
/dev |
|
6 |
tmpfs |
tmpfs |
991M |
0 |
991M |
0% |
/dev/shm |
|
7 |
tmpfs |
tmpfs |
991M |
9.5M |
981M |
1% |
/run |
|
8 |
tmpfs |
tmpfs |
991M |
0 |
991M |
0% |
/sys/fs/cgroup |
|
9 |
/dev/mapper/centos-root |
xfs |
40G |
1.5G |
39G |
4% |
/ |
|
10 |
/dev/sda1 |
xfs |
497M |
130M |
367M |
27% |
/boot |
|
11 |
tmpfs |
tmpfs |
199M |
0 |
199M |
0% |
/run/user/0 |
|
12 |
/dev/sdb1 |
xfs |
3.0G |
33M |
3.0G |
2% |
/iscsistorage |
 编辑/etc/fstab文件,实现挂载开机自动生效
- 使用blkid确定文件系统UUID并使用UUID挂载,而不是/dev/sd*设备名称。(每次引导时显示的设备名称都不同,具体取决于iSCSI设备通过网络进行响应的顺序。如果按设备名称挂载,这会导致使用错误的设备。)
- 在/etc/fstab中使用_netdev作为挂载选项。(这将确保客户端不会尝试挂载文件系统,直至启用联网。否则,在引导时系统将出错。)
- [root@client ~]# blkid /dev/sdb1
- /dev/sdb1: UUID="d04ec76a-87c8-4812-a34d-3bd534183d9e" TYPE="xfs"
- [root@client ~]# vim /etc/fstab
- UUID="d04ec76a-87c8-4812-a34d-3bd534183d9e" /iscsistorage xfs defaults,_netdev 0 0
停止使用目标
要停止使用某个目标,可以使用命令“iscsiadm”临时注销目标。临时注销目标后,节点记录依然存在,用于在系统重新启动或iscsi服务重新启动后自动登录到目标。如果未指定门户,则将临时注销所有相关门户的目标。
永久注销目标要求删除节点记录,以便在不执行其他发现的情况下,不会再次进行手动或自动登录。如果不指定门户,将删除所有相关门户的目标节点记录。
1 iscsiadm -m node -T 发现的目标IQN [ -p target_server[:port]] -o delete
- [root@client ~]# umount /dev/sdb1
- [root@client ~]# iscsiadm -m node -T iqn.2021-10.com.example:disk1 -p 192.168.26.201:3260 -u
- Logging out of session [sid: 1, target: iqn.2021-10.com.example:disk1, portal: 192.168.26.201,3260]
- Logout of [sid: 1, target: iqn.2021-10.com.example:disk1, portal: 192.168.26.201,3260] successful.
1 iscsiadm -m node -T 发现的目标IQN [ -p target_server[:port]] -u
iSCSI客户端永久注销iSCSI目标前,一定要先执行临时注销iSCSI目标操作
- [root@client ~]# iscsiadm -m node -T iqn.2021-10.com.example:disk1 -p 192.168.26.201:3260 -o delete
- [root@client ~]# iscsiadm -m discovery -P 1
- SENDTARGETS:
- DiscoveryAddress: 192.168.26.201,3260
- iSNS:
- No targets found.
- STATIC:
- No targets found.
- FIRMWARE:
- No targets found.
- [root@client ~]# ls /var/lib/iscsi/nodes/
- [root@client ~]#
第一步:运行iSCSI发起程序。
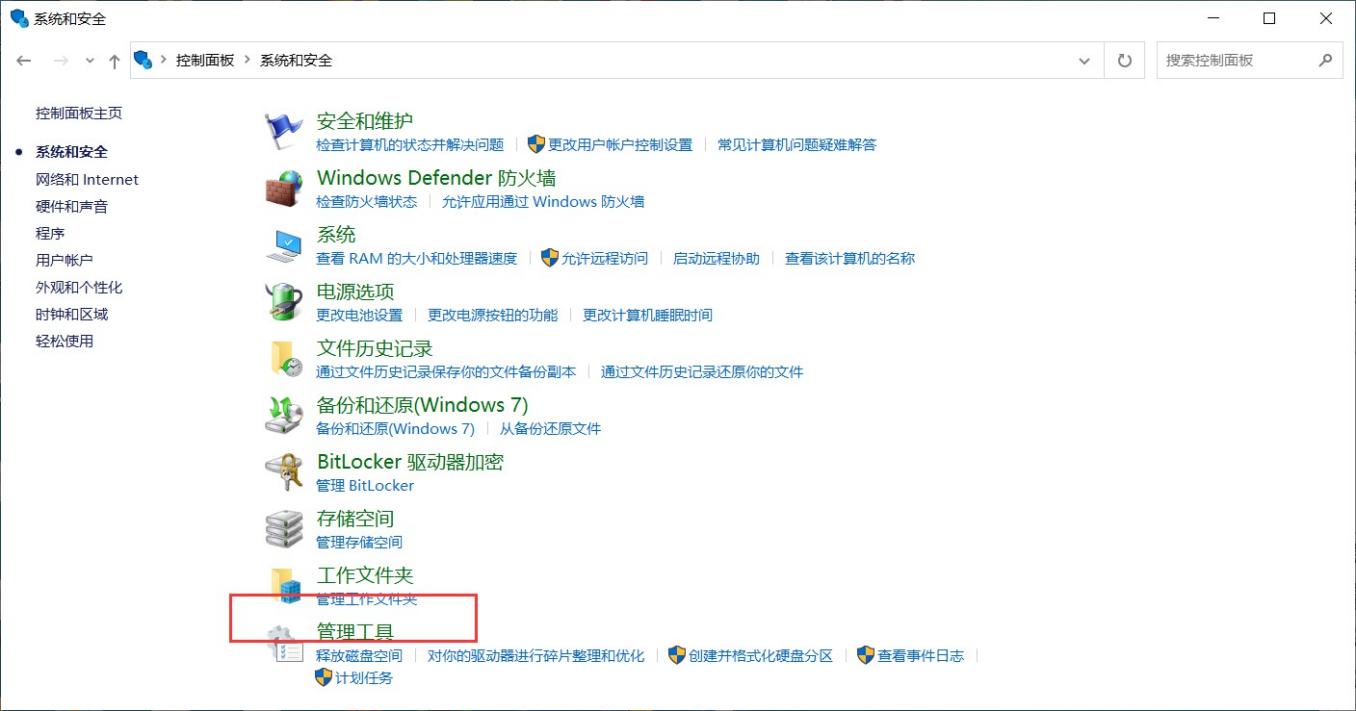
控制面板–>系统和安全–>管理工具–>iSCSI发起程序。