这是一篇"开箱即用"的 Git 入门到进阶实战文。你将从安装、配置、SSH、创建远端仓库与本地初始化开始,
迅速掌握个人开发与团队协作的两种主流程;并结合真实案例(项目 IOT_LLM 与分支 master、heshuangxin、zxj),
学会如何在他人已合入主干后安全地推送自己的改动。文末附可视化演示与速查表,拿来就能用。
📋 目录导航
🚀 基础入门
- 0. Git 与 Gitee:三句话
- 1. 安装 Git(macOS / Windows / Linux)
- 2. 配置用户与生成 SSH Key,绑定 Gitee
- 3. 创建仓库与本地初始化(两条路径)
🔄 核心协作流程
- 4. 分支与协作两种"黄金流程"
- 场景 1:不并入主干(只推分支,平台上发 MR)
- 场景 2:先并入主干(本地合并/变基后再推)
📚 实战案例
- 5. IOT_LLM 真实案例(包含
master、heshuangxin、zxj)- IOT_LLM · 案例 · 场景 1(不并入主干,只推分支)
- IOT_LLM · 案例 · 场景 2(需要并入主干,再推)
🛠️ 问题解决
- 6. 冲突处理与撤销恢复(你一定会用到)
- 7. 🧨 常见错误与处理方法
- 8. 🛡️ 防踩坑建议
⚡ 效率提升
- 9. 🚀 自动化脚本:gitdev.sh
- 10. 🐍 防止提交 .pyc 文件
🔧 进阶技巧
- 11. 进阶:钩子、LFS、稀疏检出
- 12. 架构原理图(Mermaid)
- 13. 一页速查表(收藏)
0. Git 与 Gitee:三句话
- Git 是分布式版本控制系统;Gitee 是国内常用的代码托管平台(类似 GitHub)。
- 常见对象:本地仓库、远端仓库(
origin)、分支(master/main、feature/*)。 - 核心流:工作区 -> 暂存区(
git add)-> 本地提交(git commit)-> 推送到远端(git push)。
1. 安装 Git(macOS / Windows / Linux)
- macOS:
brew install git git --version - Windows:到
https://git-scm.com下载 Git for Windows(带 Git Bash),安装后在终端执行git --version。 - Linux(Debian/Ubuntu):
sudo apt update && sudo apt install -y git
git --version
2. 配置用户与生成 SSH Key,绑定 Gitee
- 基本信息(全局一次即可)
git config --global user.name "你的名字"
git config --global user.email "you@example.com"
git config --global init.defaultBranch master   # 或 main
- 生成 SSH 密钥(建议留空直接回车)
ssh-keygen -t ed25519 -C "you@example.com"
# 生成于 ~/.ssh/id_ed25519 与 ~/.ssh/id_ed25519.pub
-
到 Gitee 个人设置 → SSH 公钥,粘贴
id_ed25519.pub内容,标题任意。 -
验证连接
ssh -T git@gitee.com
# 首次连接会提示是否继续,输入 yes;若看到用户名问候即成功
3. 创建仓库与本地初始化(两条路径)
路径 A:先在 Gitee 新建仓库,再 clone
-
在 Gitee 新建仓库(设为私有/公开均可),复制 SSH 地址
git@gitee.com:<owner>/<repo>.git。 -
克隆到本地
git clone git@gitee.com:<owner>/<repo>.git MyProject
cd MyProject
- 首次提交
echo "# MyProject" > README.md
git add -A && git commit -m "chore: init project"
git push -u origin master
路径 B:本地先 init,再推到 Gitee 空仓库
mkdir MyProject && cd MyProject
git init
echo "# MyProject" > README.md
git add -A && git commit -m "chore: init project"
git remote add origin git@gitee.com:<owner>/<repo>.git
git push -u origin master
小贴士:把 .env、node_modules/、dist/ 等加入 .gitignore,避免把隐私或构建产物推上去。
下面是 7 个常用 Git 命令的作用 + 何时用 + 常见用法(超简明小抄):
| 命令 | 作用是什么 | 什么时候用 | 常见用法/备注 |
|---|---|---|---|
fetch |
从远端拉“更新信息”到本地(远端分支、标签、提交),不改动你当前工作区/分支 | 想先看远端最新但不合并;在 rebase/merge 前的准备 | git fetch origin;只抓某分支:git fetch origin master |
rebase |
把你这条分支的提交“搬到”新的基底(如最新 master)并重放,历史更线性(会改写提交哈希) | 合并前整理历史;跟上最新主干 | git rebase origin/master;遇冲突 → 解决→git add→git rebase --continue;放弃:git rebase --abort |
switch |
切换/创建分支(新语法,替代部分 checkout) |
在分支间切换;从主干开新分支 | 切换:git switch heshuangxin;新建并切换:git switch -c feature/login |
pull |
抓取并合并到当前分支(= fetch + merge,默认) |
一步把远端更新合到当前分支 | git pull;想线性历史:git pull --rebase |
push |
把本地提交推到远端 | 同步你的分支/标签到远端仓库 | 初次推送并建立跟踪:git push -u origin feature;改写历史后推:git push --force-with-lease |
add |
把改动放进暂存区(准备被提交) | 选择要进本次 commit 的文件/片段 | 全部:git add -A;单文件:git add app.py;交互选择:git add -p |
commit |
把暂存区的改动生成一个提交(记录快照) | 完成一个逻辑单元的修改 | git commit -m "feat: 支持导出PDF";修改最近一次信息:git commit --amend |
一条常见工作流(安全做法)
git switch feature
git add -A
git commit -m "feat: 我的改动"git fetch origin
git rebase origin/master      # 或:git pull --rebase
# 解决冲突 -> git add 冲突文件 -> git rebase --continuegit push -u origin feature    # 若做过 rebase:git push --force-with-lease
小提示
- 公共分支慎用
rebase;若用了,推送请用--force-with-lease(更安全)。 fetch不会动你当前分支,很适合“先看看再决定怎么合”。- 养成“小步提交、清晰信息、按功能点提交”的习惯,回退/审查都更轻松。
4. 分支与协作两种“黄金流程”
当你在个人分支开发并提交后,推到远端并发起 Merge Request(MR)是最佳实践。是否需要把主干 master 的最新改动合入你的分支,决定了两套流程。
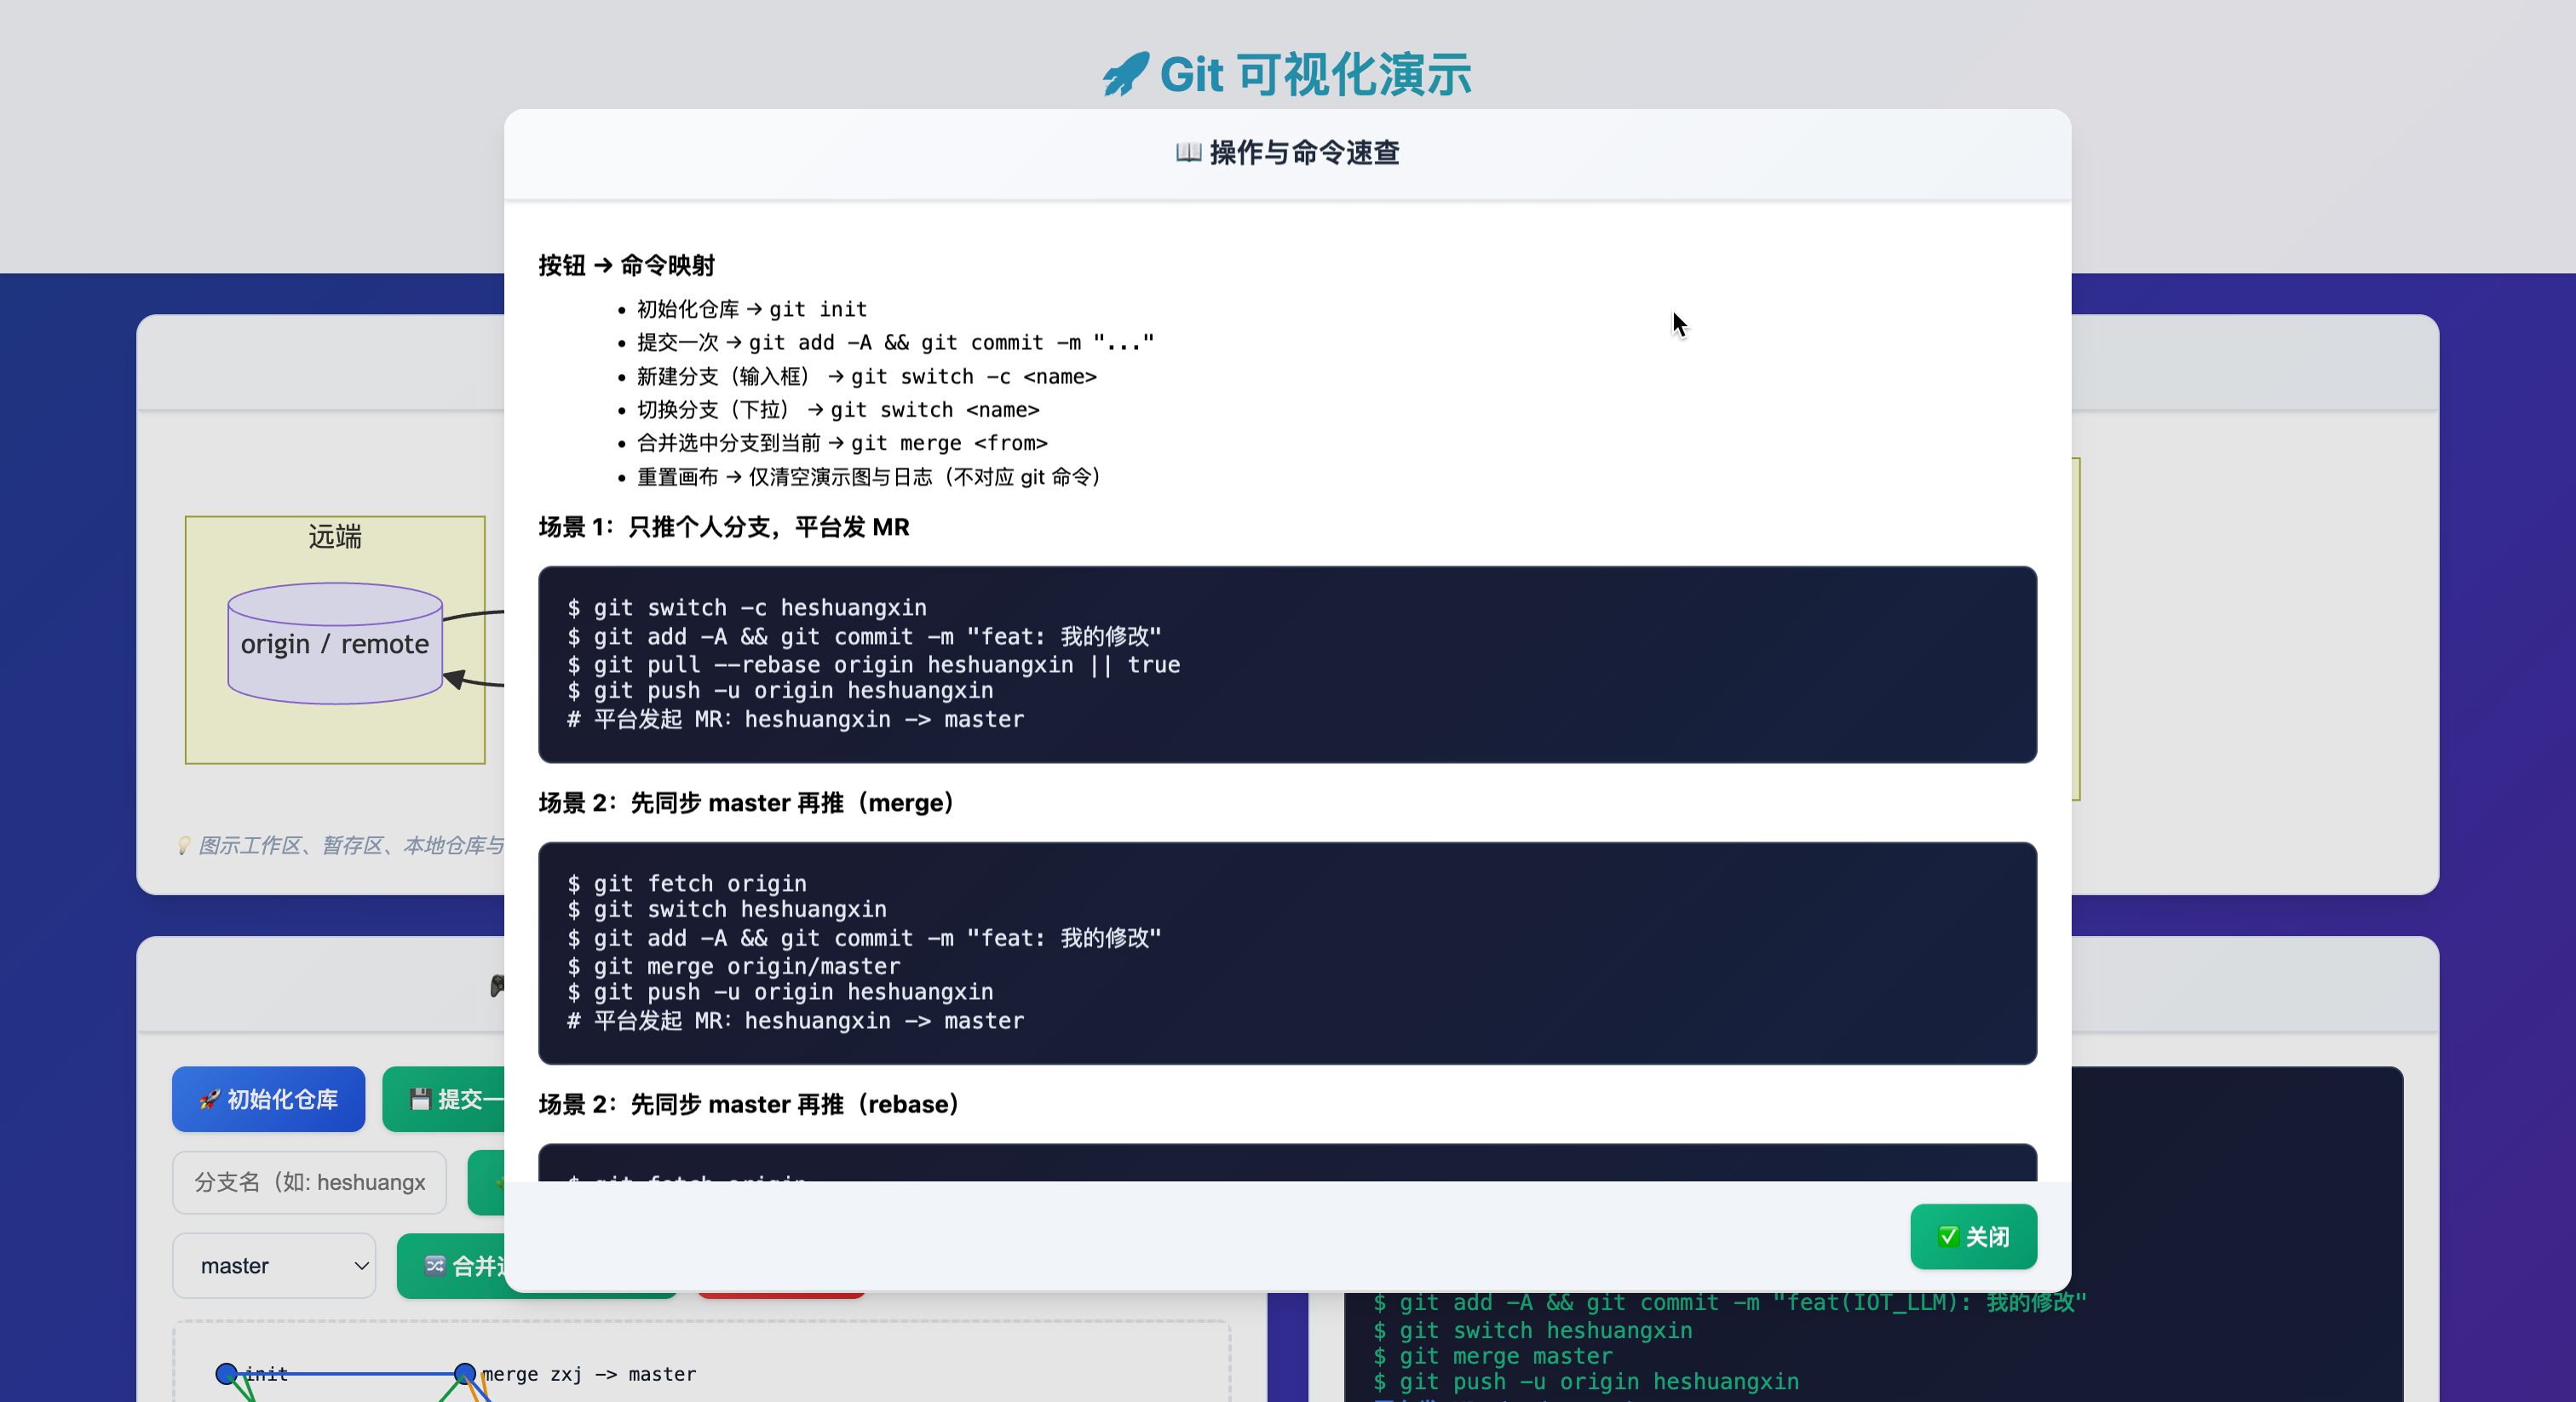
场景 1:不并入主干(只推分支,平台上发 MR)
适用于:你只需提交自己的改动,不需要把 master 的更新拉到你分支。
# 一次性切分支(若远端已有,可直接切换)
git switch -c heshuangxin || git switch heshuangxin || git switch -c heshuangxin origin/heshuangxin# 开发与提交
git add -A
git commit -m "feat: 我的修改"# 若远端该分支别人也推过,先衔接避免 non-fast-forward
git pull --rebase origin heshuangxin || true# 推送并建立 upstream
git push -u origin heshuangxin# 到 Gitee 发 MR:heshuangxin -> master
场景 2:先并入主干(本地合并/变基后再推)
适用于:你要先解决与 master 的差异,让 MR 更干净,提前发现冲突。
做法 A:rebase(推荐,历史更线性)
git fetch origin
git switch heshuangxin
git add -A && git commit -m "feat: 我的修改"  # 或 git stash -u
git rebase origin/master
# 冲突 -> 编辑解决 -> git add <file> -> git rebase --continue
# 放弃此次变基 -> git rebase --abort
git push -u origin heshuangxin --force-with-lease
# 发 MR:heshuangxin -> master
做法 B:merge(最稳,保留分叉)
git fetch origin
git switch heshuangxin
git add -A && git commit -m "feat: 我的修改"
git merge origin/master
git push -u origin heshuangxin
# 发 MR:heshuangxin -> master
5. IOT_LLM 真实案例(包含 master、heshuangxin、zxj)
前提:
- 你第一次是从
master下载代码,切到heshuangxin开发; - 同时团队成员
zxj已经把自己的改动合并进了master。
如何推送你的代码?两种做法如下。
IOT_LLM · 案例 · 场景 1(不并入主干,只推分支)
git clone git@gitee.com:<owner>/IOT_LLM.git && cd IOT_LLM
git switch -c heshuangxin || git switch heshuangxin || git switch -c heshuangxin origin/heshuangxin
git add -A && git commit -m "feat(IOT_LLM): 我的修改"
git pull --rebase origin heshuangxin || true
git push -u origin heshuangxin
# 在 Gitee 发起 MR:heshuangxin -> master
IOT_LLM · 案例 · 场景 2(需要并入主干,再推)
A) rebase(推荐)
git fetch origin
git switch heshuangxin
git add -A && git commit -m "feat(IOT_LLM): 我的修改"
git rebase origin/master
# 冲突 -> 解决 -> git add <file> -> git rebase --continue | --abort
git push -u origin heshuangxin --force-with-lease
# 在 Gitee 发起 MR:heshuangxin -> master
B) merge(最稳)
git fetch origin
git switch heshuangxin
git add -A && git commit -m "feat(IOT_LLM): 我的修改"
git merge origin/master
git push -u origin heshuangxin
# 在 Gitee 发起 MR:heshuangxin -> master
6. 冲突处理与撤销恢复(你一定会用到)
处理冲突(以 rebase 为例)
git rebase origin/master
# 文件出现 <<<<<<< / ======= / >>>>>>> 标记
# 手工合并 -> git add <file> -> git rebase --continue
# 放弃这次变基:git rebase --abort
撤销与恢复常用命令
git restore <file>               # 丢弃工作区改动
git restore --staged <file>      # 取消暂存
git reset --soft <sha>           # 仅移动 HEAD
git reset --mixed <sha>          # 默认,保留工作区
git reset --hard <sha>           # 回到指定提交(危险)
git revert <sha>                 # 生成反向提交,安全撤销
git reflog                       # 找回历史指针
7. 🧨 常见错误与处理方法
以下是多人开发 Git 流程中经常遇到的错误及处理方法合集,适合每人维护独立开发分支(如 heshuangxin)的团队使用。
❌ 1. fatal: 'origin/xxx' does not appear to be a git repository
原因:错误地把远程分支当成仓库地址使用了。
# 错误 ❌
git pull origin/xxx# 正确 ✅
git pull origin xxx
❌ 2. Your branch is behind 'origin/xxx'
原因:本地分支落后于远程,需要同步。
处理:
git pull origin xxx  # 合并方式
# 或(推荐使用 rebase 保持历史整洁)
git pull --rebase origin xxx
❌ 3. You have unstaged changes. 无法提交
原因:改了文件但没有 git add,无法 commit。
处理:
git add .
git commit -m "说明"
❌ 4. Merge conflict in xxx (合并冲突)
原因:你改的文件和远程改动冲突。
处理流程:
# 查看冲突文件
git status# 手动修改冲突文件,保存后:
git add <已解决的文件>
git commit     # 合并后补交一次 commit
❌ 5. fatal: Could not read from remote repository.
原因:
- 没有权限(尤其是用 SSH 时)
- SSH key 未配置
- 仓库地址写错
处理:
# 检查 SSH key 是否添加到 Gitee / GitHub
ssh -T git@gitee.com# 也可改用 HTTPS 拉代码:
git remote set-url origin https://gitee.com/your/repo.git
❌ 6. 忘了切换到自己的分支就在 master 上开发
处理方式:
# 将改动转移到自己的分支
git checkout -b heshuangxin    # 创建并切换
# 或:
git stash                 # 临时保存改动
git checkout heshuangxin
git stash pop             # 恢复改动到正确分支
❌ 7. push 报错:rejected - failed to push some refs
原因:远程有更新,推送冲突。
处理:
# 先同步远程
git pull --rebase origin heshuangxin
# 再推送
git push origin heshuangxin
❌ 8. 误删了文件或改错了内容
处理:
git checkout -- <filename>     # 恢复单个文件
git reset --hard HEAD          # 全部恢复为上次提交状态(慎用)
❌ 9. 其他常见错误
! [rejected] (non-fast-forward)  -> 先衔接:git pull --rebase origin <branch>
pre-receive hook declined        -> 受保护分支,推个人分支走 MR
detached HEAD                    -> git switch <branch> 回到分支
It seems there is already a rebase-merge -> 正在 rebase:--continue 或 --abort
8. 🛡️ 防踩坑建议
- 提交前检查:
git status确认文件状态,避免提交临时文件 - 小步提交:一次提交解决一个问题,便于回滚和 code review
- 先 fetch 再操作:
git fetch origin成为肌肉记忆 - 分支命名规范:
feature/功能名、fix/问题描述、hotfix/紧急修复 - 提交信息规范:
<type>: <subject>(如feat:、fix:、chore:)
9. 🚀 自动化脚本:gitdev.sh
创建一个自动化脚本,一键完成同步 master 并推送当前分支:
#!/bin/bash
echo "🔄 同步 master 分支代码并推送当前分支(heshuangxin)"git checkout heshuangxin
git fetch origin
git rebase origin/mastergit status
echo "✅ 请确认文件无误后,输入 commit 信息:"
read -p "📝 commit message: " msggit add .
git commit -m "$msg"
git push origin heshuangxinecho "🚀 推送完成!"
使用方法:
chmod +x gitdev.sh
./gitdev.sh
10. 🐍 防止提交 .pyc 文件
在 Git 提交时忽略 .pyc 文件有几种做法:
1. 在项目里加 .gitignore
在你的项目根目录(.git 所在目录)新建或编辑 .gitignore 文件,加入:
# Python 编译文件
__pycache__/
*.pyc
*.pyo
*.pyd
这样 Git 在后续的提交中会自动忽略 .pyc 文件。
2. 如果之前已经提交过 .pyc 文件
仅仅加 .gitignore 不会把仓库里已有的 .pyc 删除。需要先移除:
# 删除缓存的 .pyc 文件(保留本地文件)
git rm --cached -r *.pyc __pycache__/
git commit -m "Remove pyc files from repository"
以后这些文件就不会再被追踪。
3. 全局忽略(对你所有仓库生效)
如果你不想每个项目都写 .gitignore,可以设置全局规则:
git config --global core.excludesfile ~/.gitignore_global
然后在 ~/.gitignore_global 文件里写上:
*.pyc
__pycache__/
4. IDE 也能帮忙
如果你用 PyCharm / VSCode,通常也有内置的 .gitignore 模板,直接一键生成(比如 PyCharm 右键项目 → "Git → .gitignore")。
✅ 推荐:项目根目录建 .gitignore,保证团队协作时大家都不会提交 .pyc。
11. 进阶:钩子、LFS、稀疏检出
- 本地钩子
.git/hooks/pre-commit(示例)npm run lint && npm test || exit 1 - Git LFS(大文件)
git lfs install git lfs track "*.bin" git add .gitattributes && git commit -m "chore: lfs" - 稀疏检出(只要子目录)
git clone --filter=blob:none --no-checkout git@gitee.com:<owner>/<repo>.git
cd <repo>
git sparse-checkout init --cone
git sparse-checkout set packages/app-web
git checkout master
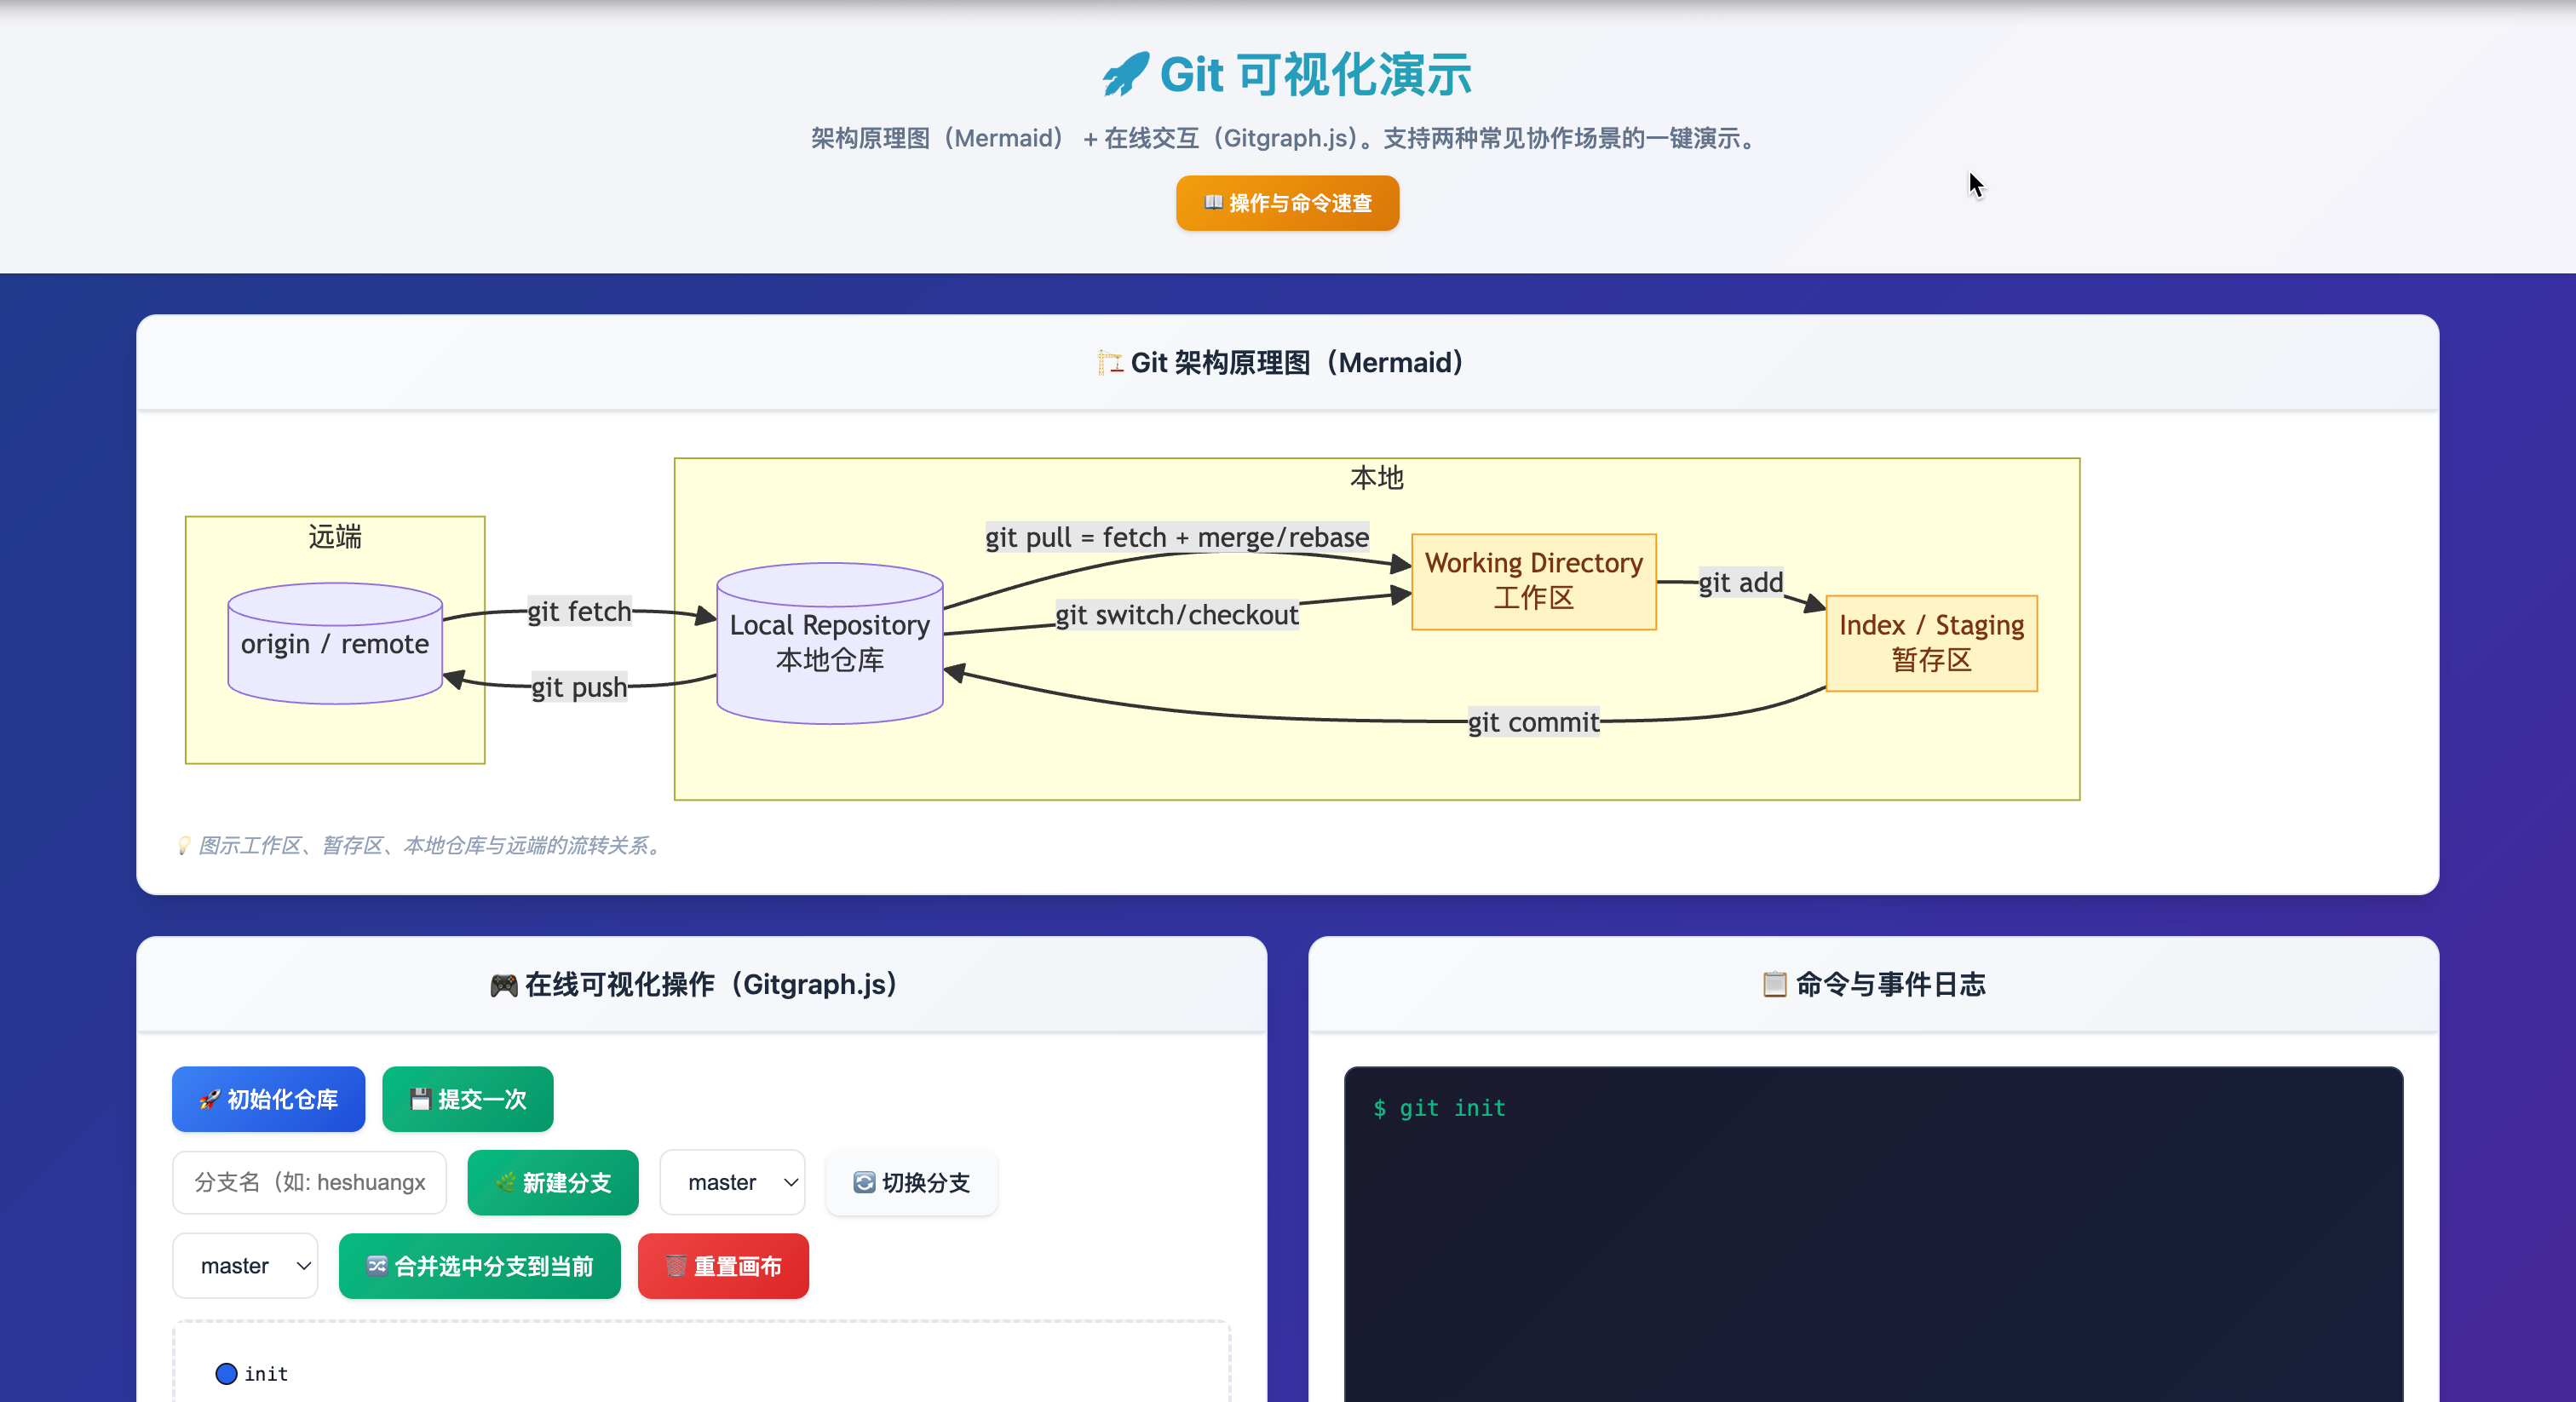
12. 架构原理图(Mermaid)
可在本仓库打开可视化演示页面:visual-demo/index.html,支持在线操作与场景一键播放。
13. 一页速查表(收藏)
# 身份 & SSH
git config --global user.name "Your Name"
git config --global user.email "you@example.com"
ssh-keygen -t ed25519 -C "you@example.com"
ssh -T git@gitee.com# 新建 / 克隆
git init | git clone git@gitee.com:<owner>/<repo>.git# 日常提交
git status
git add -A
git commit -m "<type>: <subject>"# 推送 / 拉取
git push -u origin <branch>
git pull --rebase# 分支
git switch -c feature/x | git switch feature/x
git merge origin/master | git rebase origin/master# 撤销与恢复
git restore <file> | git revert <sha> | git reflog

到此为止,你已经能在 Gitee 上完成从 0 到 1 的全流程,并掌握团队协作时最常用、也最高效的两种分支同步策略。记住:先
fetch,再与master同步(按需选择 merge 或 rebase),最后push并发起 MR。