线性布局案例:商品列表
大家好,我是潘Sir,持续分享IT技术,帮你少走弯路。《鸿蒙应用开发从入门到项目实战》系列文章持续更新中,陆续更新AI+编程、企业级项目实战等原创内容、欢迎关注!
ArkUI提供了丰富的系统组件,用于制作鸿蒙原生应用APP的UI,本文通过简单案例演示如何使用Column和Row组件实现线性布局。
一、商品列表
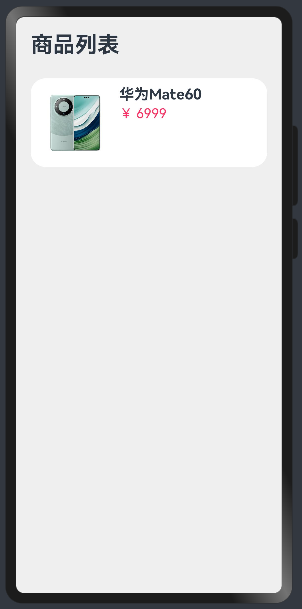
1.1 效果图

相关知识:
线性布局
渲染控制:循环渲染、条件渲染
1.2 实现代码
拷贝素材
将mate60.png拷贝到resources/base/media目录
在pages/layout/linear下新建ProductListPage.ets文件
1.2.1 先实现静态界面
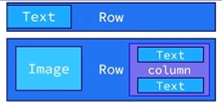
界面分析
@Entry
@Component
struct ProductListPage {build() {Column({ space: 8 }) {// 标题Row() {Text('商品列表').fontSize(30).fontWeight(FontWeight.Bold)}.width('100%').margin({ bottom: 20 })// 商品列表Row({ space: 10 }) {Image($r('app.media.mate60')).width(100)Column({ space: 4 }) {Text('华为Mate60').fontSize(20).fontWeight(FontWeight.Bold)Text('¥ 6999').fontColor('#F36').fontSize(18)}.height('100%').alignItems(HorizontalAlign.Start)}.width('100%').backgroundColor('#FFF').borderRadius(20).height(120).padding(10)}.width('100%').height('100%').backgroundColor('#EFEFEF').padding(20)}
}
效果图
1.2.2 数据循环渲染
由于列表项都相同,因此可以直接复制实现界面。但是这会导致大量重复代码,因此考虑使用循环渲染实现,先定义数据类型Item,接着定义数据items,再使用foreach循环渲染数据到界面,将写死的数据从items里取出即可。
class Item {name: string //小写image: ResourceStrprice: numberconstructor(name: string, image: ResourceStr, price: number) {this.name = namethis.image = imagethis.price = price}
}@Entry
@Component
struct ProductListPage {// 商品数据private items: Array<Item> = [new Item('华为Mate60', $r('app.media.mate60'),6999),new Item('MateBookProX', $r('app.media.mate60'),13999),new Item('WatchGT4', $r('app.media.mate60'),1438),new Item('FreeBuds Pro3', $r('app.media.mate60'),1499),new Item('Mate X5', $r('app.media.mate60'),12999)]build() {Column({ space: 8 }) {// 标题Row() {Text('商品列表').fontSize(30).fontWeight(FontWeight.Bold)}.width('100%').margin({ bottom: 20 })// 商品列表ForEach(this.items,(item:Item)=>{Row({ space: 10 }) {Image(item.image).width(100)Column({ space: 4 }) {Text(item.name).fontSize(20).fontWeight(FontWeight.Bold)Text('¥'+item.price).fontColor('#F36').fontSize(18)}.height('100%').alignItems(HorizontalAlign.Start)}.width('100%').backgroundColor('#FFF').borderRadius(20).height(120).padding(10)})}.width('100%').height('100%').backgroundColor('#EFEFEF').padding(20)}
}
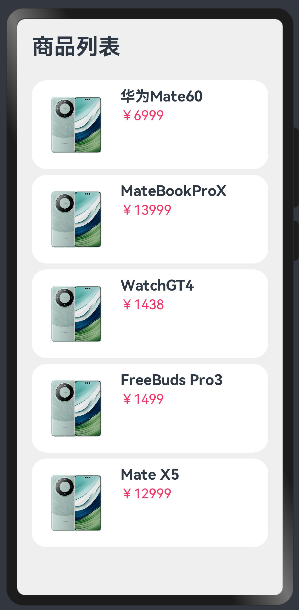
效果图
1.2.3 数据条件渲染
有的商品参加打折活动,会多一个折扣价,因此需要根据商品是否打折显示不同的价格信息。
首先修改商品数据类型,添加折扣discount字段;然后再打折商品上添加折扣价;最后再通过条件渲染界面。
class Item {name: string //小写image: ResourceStrprice: numberdiscount: numberconstructor(name: string, image: ResourceStr, price: number, discount: number = 0) {this.name = namethis.image = imagethis.price = pricethis.discount = discount}
}@Entry
@Component
struct ProductListPage {// 商品数据private items: Array<Item> = [new Item('华为Mate60', $r('app.media.mate60'),6999, 500),new Item('MateBookProX', $r('app.media.mate60'),13999),new Item('WatchGT4', $r('app.media.mate60'),1438),new Item('FreeBuds Pro3', $r('app.media.mate60'),1499),new Item('Mate X5', $r('app.media.mate60'),12999)]build() {Column({ space: 8 }) {// 标题Row() {Text('商品列表').fontSize(30).fontWeight(FontWeight.Bold)}.width('100%').margin({ bottom: 20 })// 商品列表ForEach(this.items,(item:Item)=>{Row({ space: 10 }) {Image(item.image).width(100)Column({ space: 4 }) {if(item.discount){Text(item.name).fontSize(20).fontWeight(FontWeight.Bold)Text('原价:¥' + item.price).fontColor('#CCC').fontSize(14).decoration({type: TextDecorationType.LineThrough})Text('折扣价:¥' + (item.price - item.discount)).fontColor('#F36').fontSize(18)Text('补贴:¥' + item.discount).fontColor('#F36').fontSize(18)}else {Text(item.name).fontSize(20).fontWeight(FontWeight.Bold)Text('¥'+item.price).fontColor('#F36').fontSize(18)}}.height('100%').alignItems(HorizontalAlign.Start)}.width('100%').backgroundColor('#FFF').borderRadius(20).height(120).padding(10)})}.width('100%').height('100%').backgroundColor('#EFEFEF').padding(20)}
}
效果图
《鸿蒙应用开发从入门到项目实战》系列文章持续更新中,陆续更新AI+编程、企业级项目实战等原创内容,防止迷路,欢迎关注!